A multi-layer rack adds shelf space. It does not add power. That one sentence explains most of what goes wrong with them, and it is the thing almost nobody tells you before you buy one.
Your air fryer has a resistive heating element with a fixed rating — commonly somewhere between 1,400 W and 1,800 W on a 120 V, 60 Hz North American circuit. Check the plate on the back or underside of your machine for the exact figure. Putting a rack in the basket changes nothing about that number. You are asking the same wattage to cook twice as much food, and the machine responds the only way it can: by taking longer, and by crisping less aggressively on the level that gets the weaker airflow.
Used inside those limits, a rack is genuinely useful. Used outside them, it turns one good batch into two mediocre ones. Here is how to tell which situation you are in before you commit dinner to it.
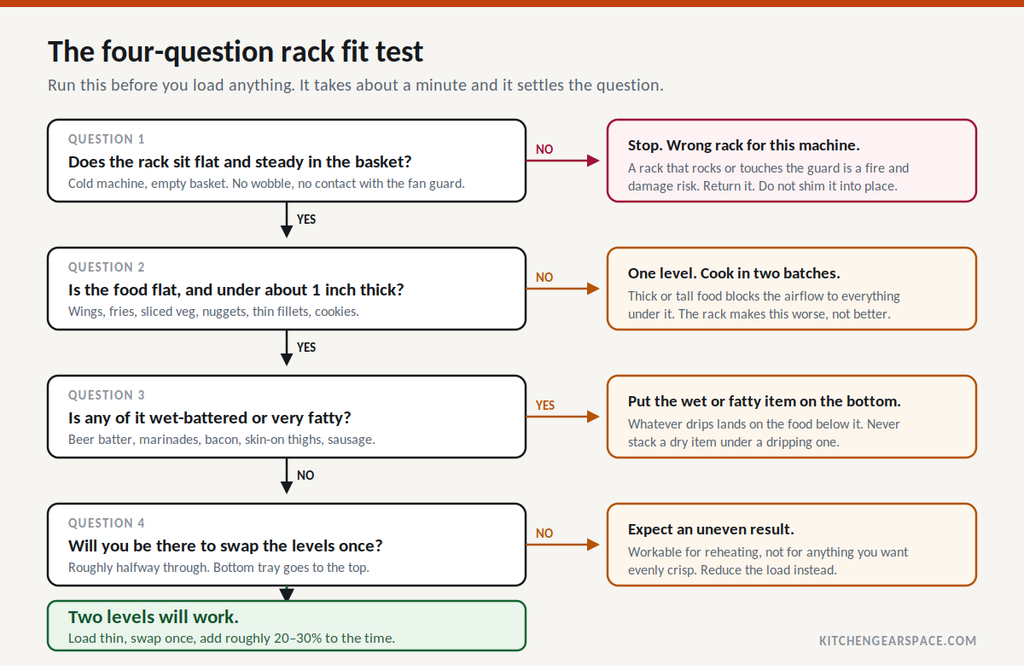
Start here: the four-question fit test
Run this cold, with an empty basket, before you cook anything on a rack for the first time.

1. Does the rack sit flat and steady? Put it in the cold, empty basket and press each corner. It should not rock, and nothing on it should reach the fan guard or element above. If it wobbles or touches, stop — that is the wrong rack for your machine. Return it. Do not pack anything underneath to level it.
2. Is the food flat, and under about an inch thick? Wings, fries, sliced vegetables, nuggets, thin fillets, cookies. If it is thicker or taller than that, a rack works against you: tall food blocks the flow to everything under it, and you have now built a wall inside the one part of the machine that depends on air moving freely.
3. Is any of it wet-battered or very fatty? Whatever drips lands on the food underneath. Put the dripping item on the bottom level, always. Never stack something dry under something that renders fat.
4. Will you be around to swap the levels once? Roughly halfway through, bottom tray goes to the top. If you will not be there, expect an uneven result and plan around it.
Clear all four and two levels will work. Fail one and the answer is usually a smaller load on one level, not a cleverer arrangement on two.
Which level is closer to the heat? Not the one you think
This is the single most common error in advice about air fryer racks, and it is worth getting right because everything else follows from it.
In a basket-style air fryer, the heating element and the fan are at the top of the cooking chamber, above the basket. The upper level of your rack is the one closer to the heat. The lower level is further from it. Open your machine and look up — the coil and the fan guard are right there.
Oven-style air fryers differ — many have elements at both the top and the bottom, and some heat only from above. Check the inside of yours before assuming.
Two things happen below the upper level in a basket machine:
The lower level sits in an air shadow. Air leaves the fan at speed, hits the top layer of food, and slows and spreads. What reaches the bottom is slower and more turbulent. Browning depends on hot air scrubbing moisture off the surface, and slower air scrubs less.
Steam from the top layer is carried down onto the bottom one. Food does not brown until its surface is dry. Extra humidity in the lower zone keeps that surface in the evaporation phase longer. Your bottom level is not undercooked because it is far from the element; it is pale because it is being gently steamed by the food above it.
That is the mechanism. Once you know it, the fixes are obvious: keep loads thin so air still gets through, and swap the levels once so both spend time in the fast, dry air near the fan.
What the rack costs you in time, and what it saves you in money
Since the wattage is fixed, the arithmetic is worth doing.
Driving water off food is the expensive part of crisping. It takes roughly 2,260 kJ — about 0.63 kWh — to evaporate one kilogram of water. A batch that sheds 100 g of surface moisture needs about 0.063 kWh for the evaporation alone, before any of the energy lost to the cabinet walls and the exhaust. Double the food and you double that term. The element cannot supply it any faster, so the time has to stretch.
Plan on 20–30% more time for a full two-level load than for a single level of the same food. Set the timer for your usual single-layer time, check, then add in short increments. Do not raise the temperature to compensate — that browns the top level’s surface before the middle of anything is done.
The energy side, using a 1,500 W machine as the worked example:
| Single level, two batches | Two levels, one batch | |
|---|---|---|
| Time | 20 min + 20 min | 26 min |
| Energy at 1.5 kW | 1.00 kWh | 0.65 kWh |
| Cost at 18.34¢/kWh | 18.3¢ | 11.9¢ |
That is about 6 cents saved per meal. Cook that way three times a week and you save roughly 55 kWh — around $10 — over a year. The rack pays for itself, eventually. But if someone is selling you a rack on the promise of energy savings, that is the actual size of the prize. The real return is the twenty minutes.
The rate above is the U.S. residential average of 18.34 cents per kWh for June 2026, published by the EIA’s Electricity Monthly Update. Your own rate is on your bill and may be well above or below it. Substitute it and rerun the sum.
One thing a rack does not change: current draw. A 1,500 W appliance on a 120 V supply pulls 12.5 A whether the basket holds one layer or three. On a 15 A branch circuit that leaves roughly 2.5 A of headroom before anything else on that circuit is counted — which is why a kettle or a toaster sharing the same outlet is a problem regardless of how you load the basket. If yours has started tripping, that is a circuit question, not a rack question: see why an air fryer trips the breaker.
Loading the rack
Match the foods, not just the sizes. Everything in the basket cooks at one temperature for one duration. Items that want 400°F and items that want 325°F do not belong in the same batch, whatever level they are on. Our temperature guide by food type is a reasonable starting point for grouping.
Load the top level lighter than you think. It is your airflow gate. If the top level is packed edge to edge, almost nothing usable reaches the bottom. Leave visible gaps between pieces — you should be able to see the lower level through the top one.
Wet and fatty items go on the bottom. Gravity is not negotiable. Bacon over fries means greasy fries.
Cut to a uniform thickness. With two levels you have already given up some evenness. Do not compound it with pieces that range from 1/4 inch to 1 inch.
Swap once, halfway. Pull the basket, move the bottom tray to the top position and vice versa, and put it straight back. Some machines pause when the basket is withdrawn; some do not. Use mitts either way — the rack is steel that has been sitting under a heating element.
Do not preheat with the loaded rack inside unless your manual specifically directs it. Preheating with the food already in means the food sits through the ramp-up, which mostly adds sogginess.
Liners, foil and parchment
The rule is airflow, and it is a real safety rule, not a cooking preference.
A solid liner under food on the upper level blocks the flow to the entire lower level. A liner light enough to lift can be pulled into the fan or against the element. Both are worth avoiding.
If you use parchment, use perforated air fryer liners, keep them under food that weights them down, and never let one cover a whole level. Foil should be moulded to the food, not laid across the rack as a sheet.
Restricting airflow badly enough has a second consequence: the internal temperature near the element climbs, and the machine’s thermal limiter cycles the element off. Your food takes longer, and you may smell hot oil that has been sitting on a hotter-than-usual surface. If you have hit that point, an air fryer smoking during cooking covers what is actually burning and where.
Cleaning, and when the rack becomes the problem
Let it cool before it goes near water. Soak in warm soapy water rather than scouring; a nylon brush, not wire wool. Dry it fully — stainless steel resists rust, it does not ignore it, and a rack left damp in a drawer will spot.
Most stainless racks are dishwasher safe. Check the packaging or listing for yours rather than assuming.
The rack also introduces a wear problem worth naming. A steel rack dropped into a non-stick basket scratches the coating, and the feet do it in the same four places every time. Set it in rather than dropping it, and inspect the basket floor now and then. Our guides on cleaning an air fryer without taking it apart and when the basket needs replacing cover what to look for.
Buying a rack that actually fits
Fit is the whole decision. Everything else is secondary.
Measure your own basket. Interior width, interior depth, and — the one people skip — the vertical clearance from the basket floor to the fan guard. That last figure decides whether a two-level rack leaves usable room on both levels or just technically fits. Product listings advertise compatibility with model names; your tape measure is more reliable than their compatibility list.
Note what Consumer Reports found about capacity claims: in their lab measurements, usable air fryer capacity is often smaller than the manufacturer’s stated figure. Their air fryer buying guide covers this, along with the distinction between basket and tray-style machines. Do not size a rack from the quart rating on the box.
Stainless steel, and no coating. Painted or coated racks chip under repeated thermal cycling. Bare food-grade stainless is the sane choice and it is not expensive.
Two levels is usually the right number. Three-level racks exist. In a basket machine, the third level is generally in a dead airflow zone and functions as a warming shelf rather than a cooking one.
A rack is not a capacity upgrade. If you are routinely cooking for four or more and running out of room, you have a machine-size problem, and a $10 accessory will not solve it — see air fryers for small spaces for what the size and footprint trade-offs actually look like.
Frequently asked questions
Does a multi-layer rack use more electricity? Not per minute — the element wattage is fixed, so the draw is the same. It uses more energy per batch because the batch runs longer, but less energy overall than cooking the same quantity in two separate single-layer batches.
Which level cooks faster, top or bottom? In a basket-style air fryer, the top. The heating element and fan sit above the basket, so the upper level gets the strongest, driest airflow. Oven-style air fryers vary — some heat from both top and bottom.
How much extra cooking time should I add? Plan on 20–30% more than the single-layer time for the same food, then check and extend in short increments. Do not raise the temperature instead; that burns the top level before the rest is done.
Can I use parchment or foil on the rack? Only if it is perforated, weighted down by food, and does not cover an entire level. A solid liner on the upper level starves the lower level of airflow, and a loose sheet can reach the fan or the element.
Is a three-level rack better than a two-level one? Rarely, in a basket machine. The third level usually sits in an airflow dead zone and cooks very slowly. Two well-spaced levels beat three crowded ones.
Will a rack fit my air fryer? Measure the interior width, the interior depth, and the vertical clearance from the basket floor to the fan guard. Check that measurement against the rack’s dimensions rather than relying on the seller’s compatibility list.
Can I dehydrate on a multi-layer rack? Only if your machine has a dehydrate function that holds a genuinely low temperature for hours. A standard air fryer’s lowest setting is usually too high, and its thermostat is not designed to hold a low set point for that long. Check your manual for the minimum temperature and the maximum run time.
About this article
This guide was written from an electrical engineering perspective, using manufacturer service documentation, appliance rating-plate figures, and analysis of recurring failure reports. Electrical figures assume 120 V, 60 Hz North American residential wiring on a 15 A or 20 A branch circuit.
Nothing here is a substitute for a licensed electrician or an authorised service technician. Do not open a mains-powered appliance to attempt a repair.
Last reviewed: September 2026

Kitchen Gear Space covers the engineering side of countertop cooking appliances — power draw, circuit loading, and why these machines fail. How we evaluate