You don’t need to take it apart. On a basket-style air fryer, every surface that food and grease actually touch can be reached through the basket opening or by tipping the unit onto its back. The parts you can’t reach — the fan housing, the motor, the wiring, the over-temperature protection — sit on the dry side of the airflow path and don’t collect cooking soil in the first place. If one of those is your problem, cleaning was never the fix.
So the useful question isn’t how to get inside. It’s which of three jobs you’re actually looking at. Two minutes will tell you.
Start here: the two-minute look
Unplug it. Wait until the housing is cold to the back of your hand — cold, not warm. Pull the drawer out, lift off the crisper plate, tip the body onto its back or fully upside down on a folded towel, and shine a flashlight up into the chamber. Then match what you see.
| What you’re looking at | What it is | What it needs |
|---|---|---|
| Loose crumbs and a thin film that wipes off | Routine soil | The 15-minute clean below. Zones 1 and 2. |
| Brown or amber varnish, tacky, won’t wipe away | Polymerised grease | Soak and paste. Half an hour, most of it waiting. |
| Black flaky carbon on the element itself | Burnt-on residue | Same treatment, gentler. It will return unless the cooking changes. |
| Looks clean, but still smokes on an empty preheat | Residue somewhere you can’t reach, or a failing part | Stop cleaning. See the last section. |
| Hot-plastic or electrical smell, scorch marks, buzzing, or it trips the breaker | Not a cleaning problem at all | Unplug it and leave it unplugged. |
That last row matters more than the rest of this article. A burning smell that isn’t food and a unit that trips its breaker are electrical symptoms. Scrubbing doesn’t address them.
Why the smoke comes from above
Almost every cleaning guide skips this, and it changes how you approach the job.
Your heating element is a resistance wire inside a metal sheath. When you set 400 °F, that’s the air temperature the thermostat is aiming for. The sheath has to run considerably hotter than the air in order to push heat into it — that’s how radiant and convective transfer work.
Cooking oils smoke somewhere in the 350–450 °F range depending on the oil. So fat that splashes upward onto the element is instantly past its smoke point, while food a few inches below cooks perfectly happily. That’s why a machine with a spotless basket can still fill your kitchen with smoke. The basket is where you look; the element is where the problem is. If your unit smokes while cooking, the ceiling is the first place to check, not the last.
That oil doesn’t stay oil, either. Repeated heating drives off the volatiles and cross-links what remains into a hard amber varnish, then carbon. It’s no longer soluble in dish soap — which is why “I washed it and it’s still there” is such a common complaint.
The energy myth, while we’re here
You’ll see it claimed that a dirty element raises electricity use by 20 or 30 percent. It doesn’t, and the arithmetic takes ten seconds.
Electrical figures here assume 120 V, 60 Hz North American residential wiring on a 15 A or 20 A branch circuit. A typical countertop air fryer is rated between 1,400 W and 1,800 W. Take a 1,500 W unit: it draws 1,500 ÷ 120 = 12.5 A, and its element resistance is 120² ÷ 1,500 = 9.6 Ω.
Grease doesn’t change that resistance. Same ohms, same amps, same watts, same load on your circuit. What a grease layer and clogged vents do change is heat transfer and airflow, which shows up as longer cook times and patchier browning — not a bigger bill. We can’t put a number on that penalty, because doing so would mean running the test, and we don’t run a test kitchen. Anyone quoting a precise percentage made it up.
Hold on to the 12.5 A for a different reason: on a 15 A circuit, the 80% continuous-load convention leaves you 12 A of headroom. A 1,500 W air fryer is at the line before anything else goes on that circuit.
What the fire data actually says
The US Fire Administration’s analysis of residential cooking fires from 2017–2019 found that oil, fat and grease were the leading material ignited in the larger, non-confined fires, at 45%. The leading contributing-factor category, at 57%, was operational deficiency — which includes failure to clean equipment.
Two caveats. Those figures cover all cooking equipment and ranges dominate them; air fryers aren’t broken out. And the leading single factor is unattended cooking, not dirt. So grease near a hot element is a real risk and also not the likeliest thing to burn your kitchen down. Clean it because it smokes, tastes bad and shortens the machine’s life. The NFPA’s cooking safety guidance covers the rest.
The three zones
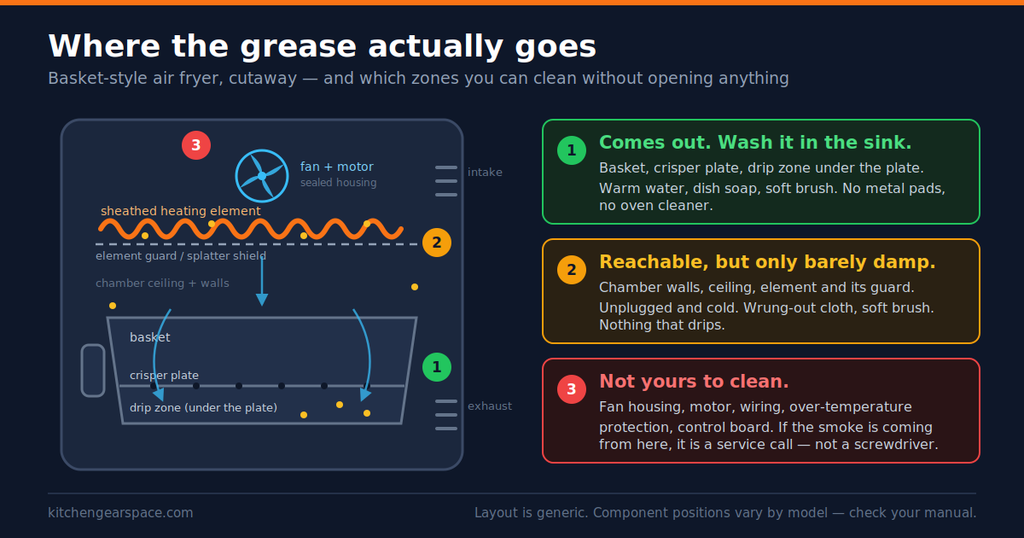
Everything below is organised around that boundary. Zones 1 and 2 are yours. Zone 3 isn’t, and the reason has nothing to do with warranties.
Zone 1: the parts that come out
Basket, crisper plate and the drip area underneath — the easy 80%.
- Empty the drip area first. Pour the fat into a jar and bin it once it sets, rather than down the sink.
- Soak before you scrub. Ten to fifteen minutes in hot soapy water beats five minutes of effort — polymerised residue softens with time, not force.
- Soft brush only. Never a metal scourer, and never oven cleaner: the caustic soda in it attacks aluminium and destroys nonstick.
- Rinse and dry fully. Water left in the crisper plate perforations is where the stale smell starts.
Dishwasher: check your manual. Many baskets are rated for it, and some manufacturers still recommend hand-washing anyway because the detergent shortens nonstick life.
Zone 2: the ceiling and the element
People either skip this or do it badly, and it’s the part that fixes the smoking.
With the unit unplugged and completely cold, tip it back or turn it upside down on a towel so you’re looking straight at the element and the guard beneath it.
- Dry-brush the loose stuff first. Soft brush, crumbs down and out.
- Wring the cloth until it stops dripping, then wring it again. Damp is the goal. Water running down toward the fan opening is the one thing you’re trying not to cause — nothing sprayed, nothing poured.
- Wipe the ceiling and walls, then the element with a light hand. The sheath is tough, but the guard below it bends, and a bent guard sits closer to the element than the designer intended.
- Leave it upside down to air out for an hour before setting it back on its feet.
If a guard or splatter shield unclips by hand, your manual will say so and it’s Zone 2. If it’s held by screws, it’s Zone 3. That’s the whole test.
Amber varnish that won’t wipe
Baking soda paste — roughly three parts bicarbonate to one part water — on the spot, left fifteen minutes, then worked with a soft brush and wiped off damp. Bicarbonate is a mild alkali and a mild abrasive, which is the right amount of both. Full method, and how to tell varnish from carbon, in our guide to cleaning the heating element with baking soda.
Two things the standard advice skips:
Vinegar has a limit. Acetic acid cuts grease and is fine on stainless. It also attacks bare aluminium — and a lot of baskets are aluminium under the coating, so every chip is exposed metal. Wipe with it, don’t soak in it, rinse it off.
Don’t mix the two. Vinegar and baking soda neutralise each other into carbon dioxide, water and a little sodium acetate. You’ve spent both reagents on a science demo. Use one or the other, separately.
The water-in-the-drawer trick: don’t
This gets recommended widely — water, detergent and a splash of vinegar in the drawer, run the machine low for five or ten minutes, let the steam lift the grime — and warned against just as flatly elsewhere. Both camps assert without explaining, so here’s the reasoning.
An air fryer is not a sealed steam oven. The chamber is deliberately vented, and the fan pulls air across the element and past a motor housed for hot dry air. Fill the drawer with water and you’ve made the chamber a humidifier. Steam follows the airflow and condenses on the first cooler surface it meets — depending on model, the element terminations, the rear intake, or the control board behind the front panel, directly above the drawer.
Will it kill the machine? Often, no; plenty of people get away with it. But the failure it risks, moisture in the motor or electronics, is one of the two that ends the appliance — and the upside is a job a damp cloth does in five minutes. Bad trade.
Your manual decides it. If your manufacturer describes the method, follow them over us. If they don’t mention it, that silence isn’t permission.
Zone 3: what you can’t clean, and shouldn’t try to
Behind the element guard sits the fan, the motor, the wiring harness, the thermostat and the over-temperature protection. Countertop heating appliances sold in the US carry some form of over-temperature cutout as a condition of their safety listing, and on many designs it’s a one-shot thermal fuse — it opens once, permanently, and the appliance is dead until a technician replaces it.
You will read advice about taking the back panel off to blow out the fan. Don’t — and the warranty is the least of it. Mains-voltage conductors sit behind that panel, and the airflow geometry is engineered: guards, shields and duct positions determine how hot the chamber gets before the thermostat sees it. Put any of it back slightly wrong and you’ve changed the machine’s thermal behaviour in a way you can’t observe.
We do not tell readers to open a mains-powered appliance. If the problem is genuinely behind the guard, that’s an authorised service call or a replacement — and for most consumer air fryers the honest arithmetic says replacement.
One Zone 3 problem you can solve from outside is airflow, and it’s mostly placement. See how much clearance an air fryer needs.
If yours doesn’t have a basket
Everything above assumes a basket-style unit with a pull-out drawer. Oven-style air fryers — the ones with a door, wire racks and a fixed crumb tray — are a different machine, and three things change.
The element is usually exposed at the top of the chamber, sometimes with a second one below. You don’t tip these units upside down. You open the door, let them cool, and work through the opening with the racks removed, which is easier than the basket-style contortion but means you’re reaching past glass and a door seal.
The crumb tray is the drip zone, and it’s often fixed. Where a basket unit lets you carry the greasy part to the sink, an oven-style unit frequently doesn’t. Scrape crumbs out dry first, then work with paste and a barely damp cloth in place — resist soaking a tray you can’t lift out and can’t tip.
The door itself is the part people skip. Grease films the inside of the glass and it’s the one surface where you’ll actually see the difference. Damp cloth, then dry; keep liquid away from the seal and the hinge.
The zone logic is unchanged. Racks and any removable tray are Zone 1. Chamber walls, ceiling, element and door glass are Zone 2. Anything behind a panel, including the rear vent assembly, is still Zone 3.
When cleaning isn’t the answer
Run this test. With the unit clean, dry and completely empty, preheat it for five minutes with your kitchen fan on and watch. No smoke means you’re done — it was the residue. Smoke or a returning burnt smell means something is still cooking off where you can’t reach, or a component is failing, and you’ve exhausted what cleaning can do.
The other end-of-life signal is the basket. Once the coating is chipped, flaking or scratched to bare metal, no cleaning method restores it — you’re cooking on exposed aluminium and scrubbing a surface that only gets worse. Our guide on when an air fryer basket needs replacing covers what to look for.
If you’ve reached this point: check whether your manufacturer sells a replacement basket for your model before you replace the whole unit — on many current models they do, and it’s a fraction of the cost. If the machine itself is done, our picks are in best non-Teflon air fryers.
Keeping it out of there in the first place
- Don’t line the chamber with foil. KitchenAid’s guidance is explicit that covering internal surfaces restricts airflow and can cause the appliance to overheat. Foil in the basket under food is a separate question; foil over vents is a thermal problem.
- Keep the crisper plate in. It’s not optional hardware — it holds food clear of the rendered fat so that fat isn’t re-heated and re-aerosolised for the whole cook.
- Wipe the same day after fatty foods. Bacon, wings, sausages, anything marinated in oil. Grease that cools once wipes off; grease reheated four more times doesn’t.
- Skip aerosol cooking sprays. The lecithin and propellants in many of them leave a residue that bakes onto nonstick and is genuinely hard to shift. Brush oil on instead.
- Drawer and plate after each use, ceiling monthly — or immediately if you smell anything. We’re not giving you a table of intervals by usage tier, because your cooking determines it and a fixed schedule is a guess dressed up as data.
Frequently asked questions
Do I need to take my air fryer apart to clean it? No. On a basket-style unit the basket, crisper plate, drip area, chamber walls, ceiling and heating element are all reachable without tools — the last few by turning the unit upside down while it’s unplugged and cold. Anything behind a screwed-down panel is a service job, not a cleaning job.
Can I put water in the basket and run it to steam-clean the inside? We don’t recommend it. The chamber is vented and the fan motor is designed for hot dry air, so deliberately generating steam sends moisture toward the intake, the element terminations and, on many models, the control board behind the front panel. A wrung-out cloth does the same job without the risk. If your manual describes the method, follow your manual.
Is vinegar safe inside an air fryer? On stainless steel, yes. On aluminium — which is what a lot of baskets are made of under the nonstick — acetic acid is corrosive, and any chip or scratch exposes bare metal. Wipe with it, rinse it off, don’t soak. And don’t combine it with baking soda; they cancel each other out.
Why does my air fryer still smoke after I’ve cleaned it? Usually because the cleaning stopped at the basket. Most air fryer smoke starts on the heating element above the food, where the sheath runs hotter than the temperature you set and splashed oil is instantly past its smoke point. If you’ve done the ceiling and element and it still smokes on an empty preheat, the residue is somewhere you can’t reach or a component is failing — service or replacement.
Can the basket go in the dishwasher? Check your manual; many are rated for it. Even where it’s permitted, hand-washing is gentler — dishwasher detergents are strongly alkaline and shorten nonstick life. The main body and anything electrical never goes near a dishwasher.
How often should I actually clean it? Drawer, crisper plate and basket after each use, or the same day at minimum for anything fatty. Ceiling and element roughly monthly, or immediately if you notice smoke or a burnt smell. Beyond that it depends on what you cook, and we’d rather say so than invent a schedule.
About this article
This guide was written from an electrical engineering perspective, using manufacturer service documentation, appliance rating-plate figures, and analysis of recurring failure reports. Electrical figures assume 120 V, 60 Hz North American residential wiring on a 15 A or 20 A branch circuit.
Nothing here is a substitute for a licensed electrician or an authorised service technician. Do not open a mains-powered appliance to attempt a repair.
Last reviewed: September 2026

Kitchen Gear Space covers the engineering side of countertop cooking appliances — power draw, circuit loading, and why these machines fail. How we evaluate