Almost every guide on this subject tells you E1 means “a temperature sensor problem,” lists five things to try, and stops. That is technically true and practically useless, because it never answers the question you actually have: is this fixable, or is my air fryer finished?
The answer depends on a specific physical failure inside the appliance. Once you know what that failure is, the troubleshooting stops being guesswork — and you can tell within about a minute which situation you are in.
Electrical figures on this page assume 120 V, 60 Hz North American residential wiring.
The short answer
E1 means the control board asked the temperature sensor for a reading and got back something impossible — not a wrong number, an out-of-range one. Rather than run a 1,500-watt heating element with no idea how hot it is, the board shuts down and shows a code.
Three situations, three different outcomes:
| What you’re seeing | What it usually is | Fixable? |
|---|---|---|
| E1 once, after a long cook or a recent wash | Heat or trapped moisture | Often yes |
| E1 immediately, every single power-on | Broken connection or dead sensor | No |
| E1 on a nearly new unit | Manufacturing defect | Warranty claim |
The rest of this guide is about telling those apart, and about the small number of things genuinely worth trying before you give up on the appliance.
What the sensor actually is
The temperature sensor in almost every air fryer is a thermistor — an NTC thermistor, meaning Negative Temperature Coefficient. It is a small component with one useful property: its electrical resistance falls as it gets hotter.
The control board wires it into a voltage divider alongside a fixed resistor, and measures the voltage at the junction between the two. That voltage corresponds to a resistance, and that resistance corresponds to a temperature. The board is never “reading a temperature” directly — it is measuring a voltage and doing arithmetic on it.
This is not a technicality. It explains everything else on this page.
When the board sees a voltage that maps to no temperature the appliance could plausibly be at — a reading implying the chamber is well below freezing, or hotter than the element can physically reach — it does not average it out and carry on. It stops. A heating element running with no valid temperature reference is one of the ways appliances start fires, and the firmware is written to refuse.
E1 is not the appliance malfunctioning. It is the safety system doing its job.
Why E1 and E2 are different codes
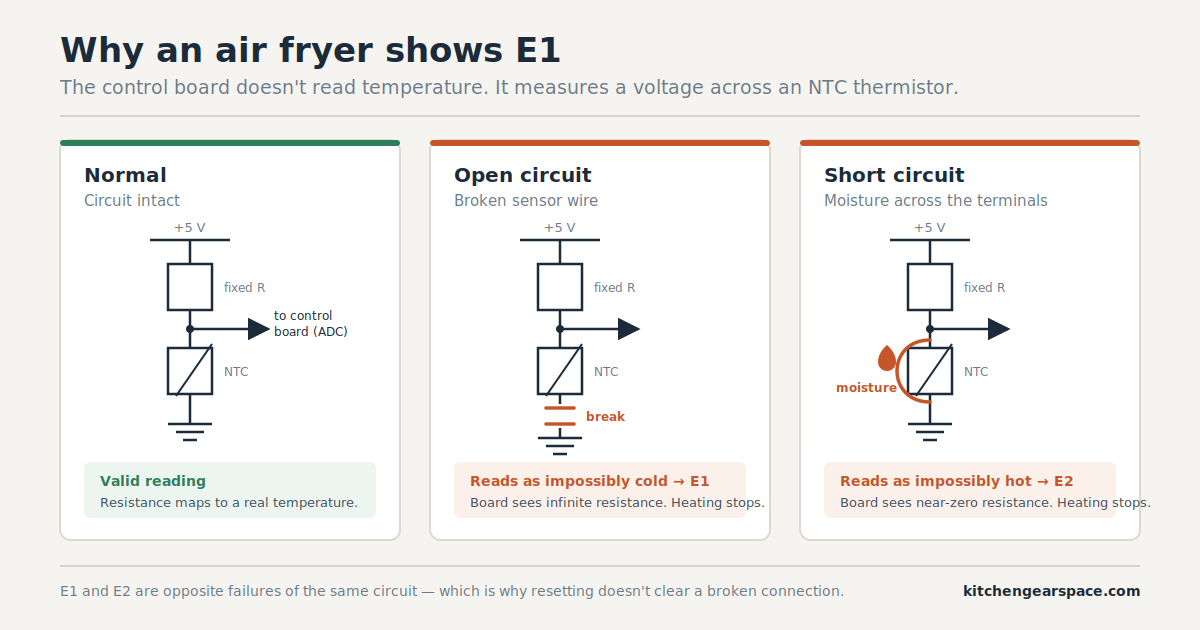
Here is the part that makes the whole error-code family suddenly make sense, and it is missing from every other guide on this topic.
A thermistor circuit can fail in two ways, and they produce opposite readings.
| Failure | What the board measures | How it reads | Code |
|---|---|---|---|
| Open circuit — broken wire, unseated connector, dead thermistor | Effectively infinite resistance | “Impossibly cold” | E1 |
| Short circuit — moisture across the terminals, chafed insulation | Effectively zero resistance | “Impossibly hot” | E2 |
This is not a theory. Cosori’s own user manual describes E1 as an open circuit in the temperature monitor, and E2 as the short-circuit case. Two codes, because they are two genuinely different physical faults.
Three useful consequences follow.
Why moisture causes these codes. Water across the sensor terminals creates a parallel conduction path, which drops the apparent resistance far below anything the thermistor should produce. The board rejects the reading. This is why the code so often turns up a day or two after someone cleaned the unit thoroughly.
Why drying it out sometimes works. Remove the water, remove the parallel path, and the circuit reads correctly again. Nothing was ever broken.
Why repeated resets don’t work on a real fault. The board is measuring a physical electrical property, not recovering from a corrupted software state. A severed conductor has exactly the same resistance after the twentieth power cycle as it did after the first. If two resets haven’t cleared it, the tenth won’t either.
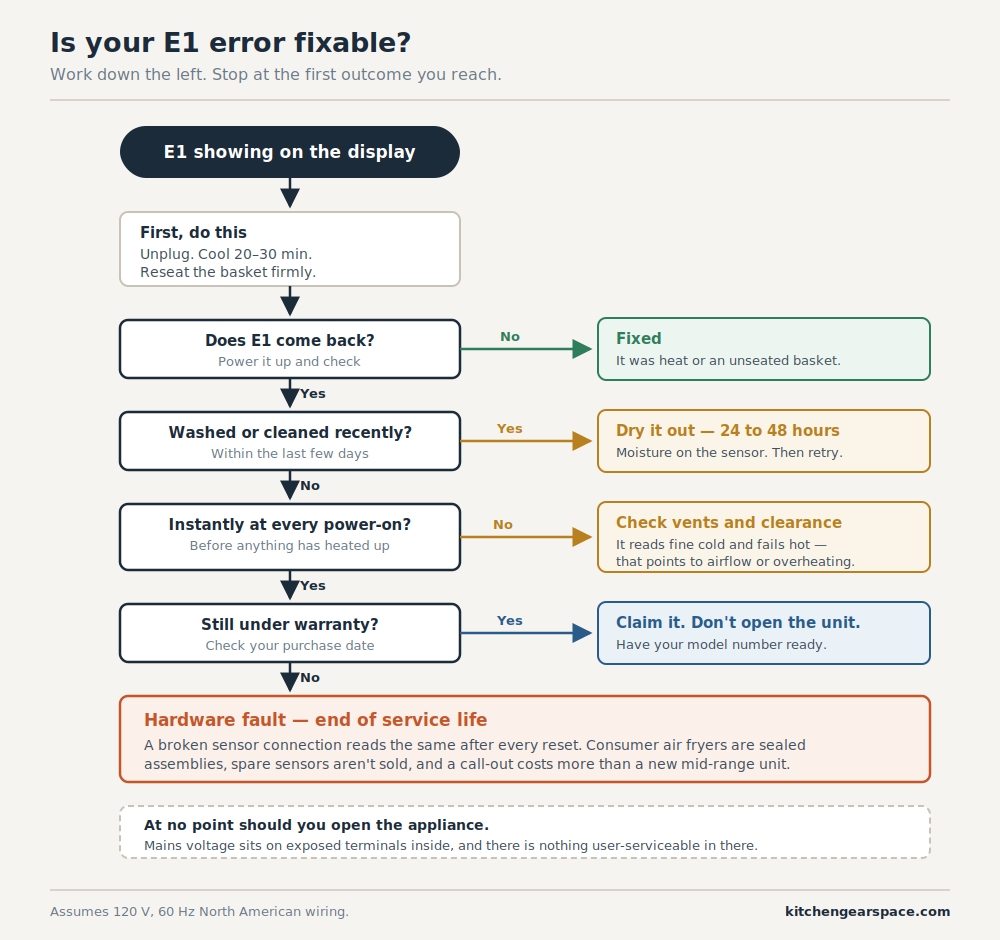
Three questions before you touch anything
1. When did it first appear?
Timing is diagnostic. E1 showing up right after a long cook, right after a thorough wash, or right after the unit was carried in from a cold garage points at heat or condensation — a temporary condition. E1 showing up out of nowhere on a unit that worked yesterday points at hardware.
2. Does it appear instantly, or a few minutes into cooking?
Instantly at power-on, before anything has heated, means the board cannot get a valid reading even at room temperature. That is a broken connection or a dead thermistor. Appearing a few minutes into a cook means the circuit reads fine cold and fails as it warms — usually a marginal connection expanding with heat, or genuine overheat protection engaging.
3. How old is it?
An E1 in the first few weeks is a manufacturing defect. Do not troubleshoot past a single cool-down — you have a warranty claim, and opening or tinkering with the unit only weakens it.
How to fix the E1 error, step by step
Work through these in order. Stop as soon as the code clears.
1. Cool down completely — and wait properly
Unplug the unit. Not switched off at the panel: unplugged at the wall. Leave it 20 to 30 minutes, longer if you had been cooking a while.
Two things happen during that wait. The chamber and sensor return to room temperature, clearing any genuine over-temperature condition. And the capacitors on the control board discharge, which properly resets the board rather than leaving it in the state it faulted in. A quick off-and-on achieves neither, which is why it so rarely works.
2. Reseat the basket
This is embarrassingly common and almost nobody lists it first. Many air fryers will not operate correctly unless the basket or drawer is pushed fully into its rails — the unit either refuses to start or throws an error. Cosori’s troubleshooting guidance for a unit that won’t turn on is simply to push the baskets in securely.
Pull the basket right out and push it back in firmly until it seats. Check the rails for a stray piece of food holding it a few millimetres short. If your model has a separate crisper plate, make sure it is lying flat rather than tilted.
3. Clear the vents and give it room
Blocked airflow causes real overheating, and real overheating causes real sensor faults.
With the unit unplugged and cool, check the intake and exhaust vents — usually at the rear and top. Clear grease film and debris with a dry brush. Then check the unit’s surroundings: crammed under a wall cabinet or pushed against a backsplash, it recirculates its own hot exhaust and runs permanently hotter than designed. Our guide to air fryer clearance requirements covers how much space these actually need.
If the fault is genuine overheating rather than a sensor failure, many manufacturers use a separate code for it — Cosori uses E3 and advises unplugging and cooling for 15 minutes, pulling the baskets out to speed it up.
4. If it was recently washed, dry it out
If E1 appeared within a few days of a thorough clean — or if water has ever run over the base rather than just the removable parts — this is your most likely cause, for the reason explained above.
Unplug it and leave it somewhere warm and dry for 24 to 48 hours. Not in an oven, not under a heat gun, not with a hairdryer aimed into the vents. Just time and dry air. Then try again.
A meaningful number of “dead” air fryers come back at this step. It costs you nothing but patience, so do not skip it.
5. Try a different outlet
Move the unit to a different circuit, ideally in another room. This rules out a marginal outlet or unstable supply. Plug directly into the wall — no extension cord, no power strip. If your air fryer has also been tripping breakers, that is a separate and more urgent problem: see why air fryers trip circuit breakers.
6. Then stop
If E1 survives all of the above, you have a hardware fault — a failed thermistor, a broken connection, or a control board problem. That is where user troubleshooting ends, and the next section explains what to do about it.
What not to do
Do not open the appliance. You will find guides telling you to unscrew the base and reseat the sensor connector. Do not follow them. An air fryer’s interior carries mains voltage on exposed terminals, there is a thermal cutoff and a heating element in there, and nothing inside a sealed consumer air fryer is designed to be user-serviced. It also voids your warranty at precisely the moment you most need it. The Consumer Product Safety Commission’s home electrical safety guidance covers what is and isn’t safe to attempt with mains-powered appliances.
Do not keep resetting and cooking anyway. The board disabled heating because it cannot verify the temperature. Overriding that means running a high-wattage element with no working thermostat.
Do not “fix” it with a surge protector. Surge protection addresses voltage spikes; it does nothing whatsoever for a sensor fault. A power strip is also a poor choice for a high-current appliance in general.
Do not submerge the base or put it in the dishwasher. Only the removable basket, drawer and crisper plate are washable, and only if your manual says so. The base contains the electronics — and washing it is one of the main ways people cause this fault in the first place.
E1 by brand
The underlying meaning is consistent — a sensor reading the board will not accept — but wording, and sometimes the numbering itself, varies.
| Brand | What the documentation says | Recommended action |
|---|---|---|
| Cosori | Open circuit in the temperature monitor. E2 is the short-circuit counterpart; E3 is overheat protection | Contact customer support for E1 and E2. For E3, unplug and cool 15 minutes |
| Ninja | Varies by model — some use E1 for overheating, and some models use “E01” rather than “E1” | Check your specific model’s manual before assuming |
| Others | Most brands use E1 for a temperature-sensor fault, but numbering is not standardised across manufacturers | Check your manual |
A warning about brand tables, including ours. Most of what you will read online about brand-specific error codes is guesswork copied between blogs. Codes differ not only between manufacturers but between models from the same manufacturer. We have listed only what we could verify against manufacturer documentation, and left the rest blank rather than fill it with plausible-sounding invention.
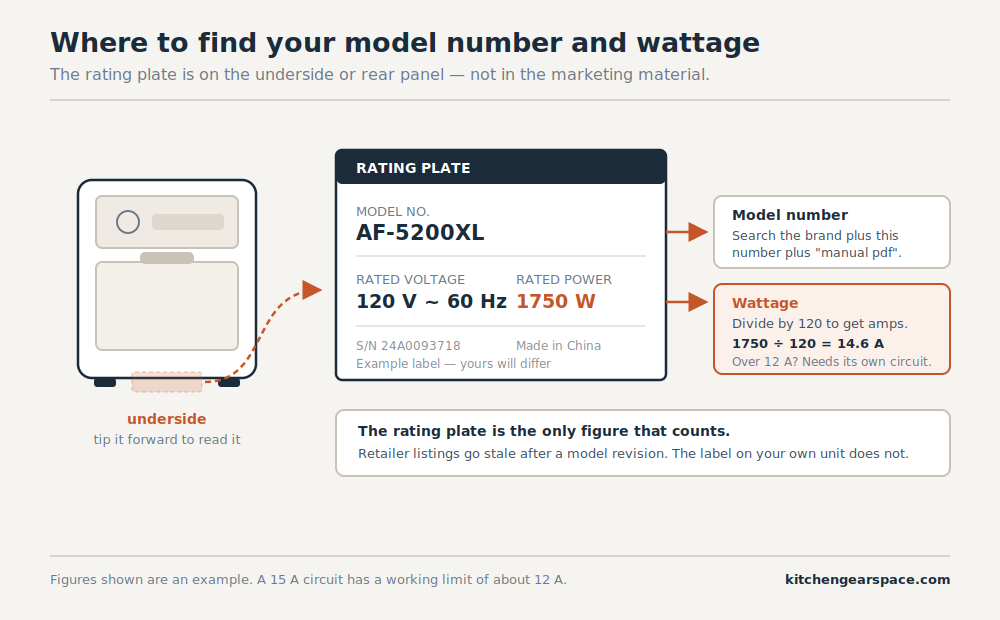
Find yours in two minutes. The model number is on the rating plate underneath the unit, on the same label as the wattage. Search the brand name plus that model number plus “manual pdf.” Nearly every manufacturer publishes manuals free, and the error code table is usually in the last few pages. That table beats any blog, including this one.
Other codes on the display
- E2 — commonly the short-circuit counterpart to E1’s open circuit
- E3 — commonly overheat protection, usually airflow-related
- Blank display, no lights at all — this is not an error code. A completely dead unit generally means a blown thermal fuse or a power supply failure, which is a different problem with a different diagnosis
When an E1 error isn’t fixable
If E1 returns immediately on every power-on after a full cool-down, the fault is physical. Here is how to think about what comes next.
Under warranty: contact the manufacturer. Sensor failures within the warranty period are routinely replaced, and since you have not opened the unit, you are in a clean position. Have your model number and proof of purchase to hand.
Out of warranty: the thermistor itself is an inexpensive component, but that is not the number that matters. Consumer air fryers are largely sealed assemblies not designed for field repair, replacement sensors are rarely sold as spare parts, and a technician’s minimum call-out charge frequently approaches the price of a new mid-range unit. The economics almost never work out.
The honest answer for most out-of-warranty E1 faults is that the appliance has reached the end of its service life.
If you are replacing it, check the wattage before you buy. A modern 1,750-watt air fryer draws around 14.6 amps at 120 volts — close to the entire capacity of a standard 15-amp kitchen circuit on its own. If your kitchen is on 15-amp circuits, a lower-wattage model will save you a second problem. We cover the arithmetic in air fryers and circuit breakers, and the models that draw least in our guide to energy-efficient air fryers.
Preventing it
Nearly all sensor faults trace back to two things: moisture and heat.
Never let water reach the base. Wash the basket, drawer and crisper plate. Wipe the chamber interior with a damp cloth and dry it. Nothing else goes near water.
Dry everything fully before reassembling. Water trapped between the basket and the chamber finds its way to places you cannot see.
Keep the vents clear. Grease film on the intake restricts airflow, and restricted airflow means the sensor and element run hotter than designed for the entire remaining life of the appliance.
Give it clearance. Manufacturers specify it for a reason — the exhaust is hot and needs somewhere to go.
Let it cool between back-to-back cooks. Ten minutes is plenty.
Frequently asked questions
What does E1 mean on my air fryer? The control board received a temperature reading outside the range it will accept and shut down heating rather than operate without a valid temperature reference. Usually an open circuit in the thermistor or its wiring.
Can I fix an E1 error myself? Sometimes. A full cool-down, reseating the basket, clearing the vents and drying the unit out cover the recoverable cases. If E1 returns immediately after all of those, it is a hardware fault and not a user repair.
Why does E1 keep coming back after I reset it? Because the board is measuring a physical electrical value, not recovering from a software glitch. A broken connection reads identically after every reset. If resetting has failed twice, it will fail the tenth time too.
Is it safe to keep using an air fryer showing E1? No. The code means temperature control cannot be verified, and an unregulated heating element is a fire risk. The appliance disabled itself deliberately.
Will cleaning fix an E1 error? It can, if the cause is debris restricting airflow or moisture bridging the sensor. Clean only what the manual says is washable, and never let water reach the base.
What is the difference between E1 and E2? They are typically the two opposite failures of the same circuit — E1 an open circuit reading as impossibly cold, E2 a short circuit reading as impossibly hot. Numbering varies by brand, so check your manual.
My air fryer is brand new and showing E1. What should I do? Return it or claim under warranty. Do not troubleshoot beyond a single cool-down and basket reseat. An E1 in the first weeks is a manufacturing defect and it is not your problem to solve.
About this article
This guide was written from an electrical engineering perspective, using manufacturer service documentation, appliance rating-plate figures, and analysis of recurring failure reports. Electrical figures assume 120 V, 60 Hz North American residential wiring on a 15 A or 20 A branch circuit.
Nothing here is a substitute for a licensed electrician or an authorised service technician. Do not open a mains-powered appliance to attempt a repair.
Last reviewed: August 2026

Kitchen Gear Space covers the engineering side of countertop cooking appliances — power draw, circuit loading, and why these machines fail. How we evaluate