Most food in an air fryer cooks between 350°F and 400°F. Below 350°F you are baking, not air frying — the surface never dries fast enough to brown properly. Above 400°F you burn the outside before the middle is done. The chart below gives a starting point for fifteen common foods, and the rest of this article explains the two things that actually decide whether that starting point works in your machine: how the temperature dial really behaves, and how much food you put in front of it.
Electrical figures here assume 120 V, 60 Hz North American residential wiring on a 15 A or 20 A branch circuit.
The chart
These are starting points, not settings we have verified in a test kitchen — we don’t run one. They come from the ranges published in manufacturer quick-start guides and from the physics of convective heat transfer. Your model will differ. Use the chart for the first cook, then adjust and write the number on a sticky note inside your cupboard door.
The column most temperature charts leave out is thickness. It is the variable that matters most, because heat has to travel from the surface to the centre by conduction, and that takes time proportional to roughly the square of the thickness. Double the thickness of a chicken breast and you roughly quadruple the time the centre needs. That is why “chicken: 375°F, 20 minutes” is close to useless without knowing how thick the piece is.
| Food | Typical thickness | Temperature | Time |
|---|---|---|---|
| Fresh-cut fries | ¼–½ in sticks | 375–400°F | 15–20 min |
| Frozen fries | ¼–½ in sticks | 400°F | 12–18 min |
| Chicken wings | ~1½ in at the joint | 380–400°F | 18–25 min |
| Breaded chicken tenders | ¾–1 in | 370–390°F | 10–15 min |
| Boneless chicken breast | 1–1½ in | 360–375°F | 15–22 min |
| Bone-in chicken thighs | 1–1½ in | 360–380°F | 20–28 min |
| Pork chops | ¾–1¼ in | 375–390°F | 12–18 min |
| Burger patties | ~¾ in | 375°F | 10–14 min |
| Salmon fillet | 1–1½ in | 350–390°F | 8–12 min |
| Shrimp | ~½ in | 380–400°F | 6–9 min |
| Broccoli, Brussels sprouts | halved, ~1 in | 375–400°F | 10–15 min |
| Root vegetable cubes | ¾–1 in | 375–400°F | 15–22 min |
| Frozen nuggets, mozzarella sticks | ½–¾ in | 375–400°F | 8–12 min |
| Cookies and small bakes | ~½ in | 300–325°F | 8–12 min |
| Reheating pizza | 1 slice | 350°F | 3–5 min |
Shake or flip anything in small pieces at the halfway mark. For anything with a coating, that is not optional — the side facing the airflow dries and browns several times faster than the side sitting on the basket floor.
What the dial is actually doing
Here is the thing that separates people who get consistent results from people who don’t.
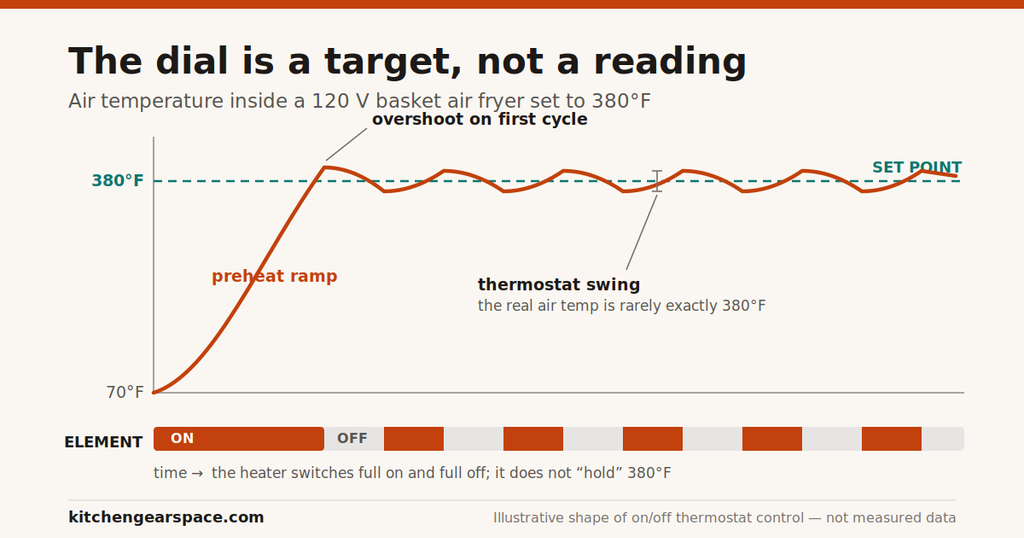
The temperature you set is a target, not a measurement. It is not a description of the air inside the basket at any given moment.
Almost every consumer air fryer regulates temperature the same way a kitchen kettle or a clothes iron does: on/off control. A sensor watches the air. When the air is below the target, the heating element runs at full power. When the air rises past the target, the element switches off completely. There is no throttling and no fine adjustment. The element is either drawing its full rated wattage or drawing nothing.
That produces the pattern in the diagram at the top of this article:
- A preheat ramp. From room temperature, the element runs continuously. In a basket-style unit this takes roughly two to four minutes to reach 380°F.
- An overshoot on the first cycle. The element and the metal around it are still radiating heat after the sensor trips. The air keeps climbing past the setpoint for several seconds before it starts falling.
- A permanent swing. After that, the air temperature oscillates above and below the target rather than sitting on it. Set 380°F and your food spends its time in a band around 380°F, never at exactly 380°F.
The practical consequences are worth understanding:
Two air fryers set to the same number will not cook identically. The width of that swing, how far it overshoots, and where the sensor is physically mounted all vary between models. A sensor near the element reads hotter than the air surrounding the food and switches off early — that unit runs cool. A sensor mounted downstream of the basket reads cooler and lets the element run longer — that unit runs hot. Both are behaving exactly as designed. Neither is broken.
This is why “my air fryer runs hot” is usually true and rarely a fault. If your food consistently comes out darker than the recipe says, your unit’s sensor placement is biased that way. Drop the setpoint 15–25°F and stop fighting it.
Opening the drawer costs you more than you think. Pulling the basket dumps the hot air. The temperature drops most of the way toward room temperature within seconds, and the element then has to run continuously again to recover. On a small unit that recovery is fast. On a full one it is not — which is the load problem, below.
The wattage myth
You will read constantly that a higher-wattage air fryer runs hotter, and that you should lower the temperature to compensate. This is wrong, and it is worth correcting properly because it sends people adjusting the wrong control.
Wattage does not set the temperature. The thermostat sets the temperature.
Wattage sets how fast the chamber reaches the target and how quickly it recovers after you open it. A 1700 W unit and a 1400 W unit both set to 380°F will both regulate to 380°F. The 1700 W unit will simply get there sooner and recover faster after the drawer is opened. That difference shows up in your total cook time — usually in the first few minutes — not in the browning temperature.
The arithmetic, on a 120 V supply:
| Rated power | Current draw | Share of a 15 A circuit |
|---|---|---|
| 1200 W | 10.0 A | 67% |
| 1500 W | 12.5 A | 83% |
| 1700 W | 14.2 A | 95% |
That last row is why a large air fryer should have its own circuit. A 15 A branch circuit is rated for a continuous load of 12 A, and an air fryer running a 25-minute cook is a continuous load in every sense that matters. Add a toaster or a kettle to the same circuit and you will find the breaker. If that is a familiar experience in your kitchen, we go through the diagnosis in why an air fryer trips a breaker.
Running cost follows directly from the same figure. A 1500 W unit is drawing 1.5 kW whenever the element is on — but because of the on/off cycling described above, it is only on for part of the cook. After preheat, a typical duty cycle is somewhere around half. A 20-minute cook at 1500 W therefore lands nearer 0.3 kWh than the 0.5 kWh you would get from multiplying power by time. We compare that against oven use in our guide to the most energy-efficient air fryers.
The variable that actually changes your cook time: load
If wattage isn’t the thing, what is? Mass and packing density.
Put twice as much food in the basket and two things happen. First, there is twice as much cold mass absorbing heat, so the element spends far more of its time switched on to hold the setpoint — the duty cycle rises, recovery slows. Second, and more importantly, packed food blocks the airflow that makes an air fryer an air fryer. The hot air can no longer reach every surface. You have quietly converted your air fryer into a slow, cramped oven.
This is why the basket-quart rating on the box tells you almost nothing about what temperature to use. A 6-quart basket does not need a higher setting than a 3-quart basket. It just holds more food, and more food means more time — at the same temperature.
Two related failures to check if your results are uneven:
- Restricted external airflow. These units draw cooling and combustion air through vents on the back or underside, and exhaust it through the rear. Pushed against a backsplash or wedged under a cabinet, the unit recirculates its own exhaust and struggles to hold temperature. See how much clearance an air fryer needs.
- A worn basket surface. As a non-stick coating degrades, its surface changes how heat conducts into whatever is touching it, and food starts sticking and browning unevenly on the underside. Here’s how to tell when a basket needs replacing.
The one temperature that is not negotiable
Everything above is about texture and browning, and it is all adjustable to taste. The internal temperature of meat is not.
Surface colour tells you nothing about whether the centre of a chicken thigh is safe. A piece can look convincingly done at 380°F while the middle sits well below a safe temperature — and in an air fryer, where the surface heats extremely aggressively relative to the core, that gap is wider than in a conventional oven, not narrower. The high-airflow surface drying that gives you good crust is exactly what makes appearance an unreliable guide.
The USDA and HHS safe minimum internal temperatures measured with a thermometer:
| Food | Safe minimum internal temperature |
|---|---|
| Chicken, turkey, all poultry — including wings, thighs, ground | 165°F (74°C) |
| Beef, pork, veal, lamb — steaks, chops, roasts | 145°F (63°C), then rest 3 minutes |
| All ground meat and sausage | 160°F (71°C) |
| Fish fillets | 145°F (63°C), or until opaque and it flakes apart |
| Shrimp, scallops, lobster | until the flesh is opaque and pearly white |
| Casseroles and leftovers | 165°F (74°C) |
| Egg dishes | 160°F (71°C) |
The rest time on the second row exists for a reason: the temperature at the centre keeps rising after the meat comes out of the heat. Cutting immediately cuts that process short.
You need one of these for the table above to mean anything.
An instant-read digital thermometer is the only way to confirm those numbers, and it’s the cheapest thing you can buy that will measurably improve your results. Look for a foldaway probe, an auto-rotating backlit display, and a claimed accuracy around ±1°F. Expect $13–$30. We haven’t cooked with every model on the market — see How We Evaluate — but on published specification the TempPro TP19H (previously ThermoPro) covers everything this article asks of a thermometer: NSF certified, ±0.9°F claimed accuracy, 4.3-inch probe long enough to reach the center of a thick chicken thigh without your knuckles entering the basket. Skip dial-face meat thermometers entirely — they’re far too slow for an eight-minute cook. We may earn a commission if you buy through this link, at no additional cost to you.
Why you shouldn’t just run everything at 400°F
Given that higher temperature means faster browning, it’s tempting to use the top of the range for everything. Three reasons not to.
The core lags further behind. At 400°F the surface reaches browning temperature long before the heat has conducted to the centre. On anything over about an inch thick, that is how you get a black crust and a cold middle. Thick food wants a lower setpoint and a longer time, not the reverse.
Fat and oil hit their smoke point. Rendered chicken fat dripping onto a hot drawer floor, or an oil sprayed above its smoke point, produces smoke that has nothing to do with the food being burnt. If that’s the symptom you’re chasing, we cover the causes in why an air fryer smokes while cooking.
Acrylamide. In starchy plant foods — potatoes and cereal-grain products in particular — sugars and the amino acid asparagine react during high-temperature cooking to form acrylamide. The FDA notes that this happens during frying, roasting and baking that the National Toxicology Program characterizes acrylamide as reasonably anticipated to be a human carcinogen, and that the human dietary risk is not precisely established. The FDA’s consumer advice is straightforward and doesn’t require you to give up fries: cook potato and grain foods to a golden yellow rather than a dark brown, and don’t refrigerate raw potatoes before frying or roasting them. Cooking at 375°F instead of 400°F and pulling the basket a shade earlier costs you almost nothing in texture.
Converting oven temperatures
The standard rule is to drop 25°F from the oven temperature and cut the time by about 20%. It’s a reasonable starting point, though the 20% is a rule of thumb rather than a measured constant, and the amount you should shave depends heavily on thickness.
The reason the rule exists is worth knowing. In a still oven, a layer of cooler air clings to the food surface and slows heat transfer into it. An air fryer’s fan strips that boundary layer away, so heat moves into the surface much faster at the same air temperature. Lowering the setpoint compensates. We work through the conversion in more detail, including where the rule breaks down, in converting oven recipes to an air fryer.
For baked goods, drop further than 25°F. Cookies and small cakes rely on the interior setting before the exterior colours, and the aggressive surface heating in an air fryer works against that. Start around 300–325°F and check early.
Should you use the presets?
Presets are a temperature and a time stored behind a button. They are a reasonable first guess and nothing more — the manufacturer had no idea how thick your chicken is or how full your basket is.
Use a preset once, note what came out, then treat it as a baseline you adjust from. If your “Fries” preset consistently overcooks, it isn’t broken; it’s calibrated for a portion size or a food thickness that isn’t yours.
Quick diagnosis
Burnt outside, undercooked inside → setpoint too high for the thickness. Drop 25°F and add time. If the food is over about 1½ inches thick, drop 50°F.
Pale and soft, never crisps → either the basket is overloaded and blocking airflow, or the surface was too wet going in. Pat food dry, use a light oil spray, cook in two batches.
Cooks much slower than the recipe says → check your clearance first, then check whether you’re opening the drawer frequently. Each opening costs recovery time.
Uneven browning across the batch → packing density, or you didn’t shake at the halfway point. If it’s consistently the underside, check the basket surface.
Consistently darker than every recipe → your unit runs hot for the reasons described above. Set 20°F lower as your permanent default and stop compensating cook by cook.
Frequently asked questions
What temperature should I set my air fryer to for most foods? Between 350°F and 400°F covers the large majority of savoury food. 375°F is a sensible default if you’re unsure. Baked goods are the exception and want 300–325°F.
Does a higher-wattage air fryer cook hotter? No. Wattage determines how quickly the unit reaches and recovers its target temperature, not what that target is. The thermostat sets the temperature. A 1700 W and a 1400 W unit set to 380°F both regulate to 380°F; the higher-wattage one just gets there sooner.
Do I need to preheat my air fryer? For fries, wings and anything you want crisp, yes — two to three minutes. Putting food into a cold chamber means it sits in warm air while the unit ramps up, which dries the surface without browning it. For thick items where you want the core cooked through, preheating matters far less, and skipping it can even help.
Is it safe to open the basket during cooking? Yes, and you’ll need to in order to shake or flip. Whether the unit pauses automatically depends on the model — many basket-drawer designs pause and resume, while some oven-style and older units keep running or require a button press to restart. Check your manual for how yours behaves.
Can I use oven temperatures in my air fryer? Use them as a starting point, lowered by about 25°F, with the time reduced by roughly a fifth. Check early the first time — the correction depends on how thick the food is.
Why does my air fryer run hotter than the temperature I set? It probably doesn’t run hotter than its own sensor reads, but the sensor may sit somewhere that doesn’t represent the air around your food. That’s a design characteristic, not a fault. Lower your setpoint 15–25°F permanently.
How do I know if my food is cooked through? Use a thermometer. Poultry to 165°F, fish to 145°F, ground meat to 160°F, whole cuts of beef and pork to 145°F with a three-minute rest. Colour and texture are not reliable indicators in an air fryer, because the surface heats much faster than the interior.
About this article
This guide was written from an electrical engineering perspective, using manufacturer service documentation, appliance rating-plate figures, and analysis of recurring failure reports. Electrical figures assume 120 V, 60 Hz North American residential wiring on a 15 A or 20 A branch circuit.
Nothing here is a substitute for a licensed electrician or an authorised service technician. Do not open a mains-powered appliance to attempt a repair.
Last reviewed: August 2026

Kitchen Gear Space covers the engineering side of countertop cooking appliances — power draw, circuit loading, and why these machines fail. How we evaluate